In the world of online everything, it’s important to maintain a safe presence and avoid malware and hacking incidents as much as possible.
Technology service providers around the world are working on offering creative solutions to stop the new and creative hacking and phishing techniques. In this article, we are addressing one solution provided by Cisco to support another provided by Microsoft and that is Cisco Email Clounf Mailbox, the solution supporting Microsoft 365 cloud email.
User setup guide
Assuming you meet the requirements, you can follow these steps to set up our Cloud Mailbox:
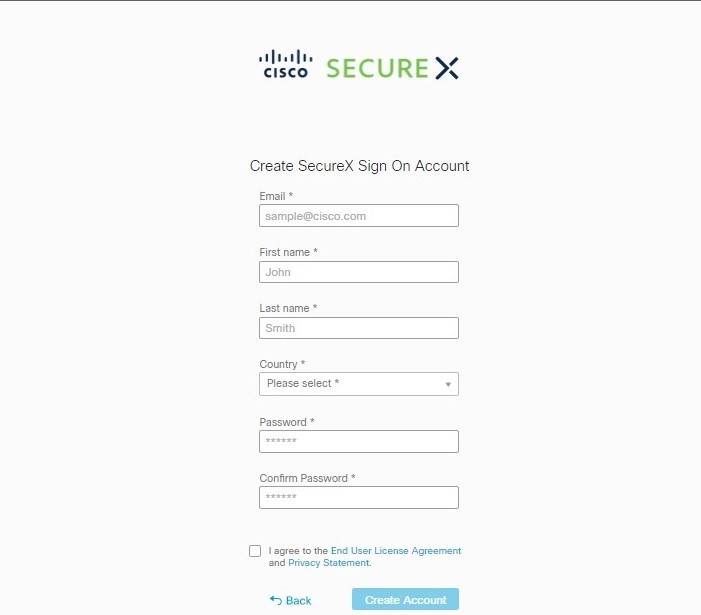
1. First, you need to sign in / sign up to your account using Cisco SecureX.
If you’re already a customer of SecureX Threat Response, Cisco Secure Analytics, or Cisco Secure Endpoint, then make sure to sign in with your existing credentials.
If you’re not, then you’ll be prompted to create a new SecureX sign-on account.
2. After the Welcome Page, you need to select Permission mode.
This will define the type of remediation policy that you can apply:
- Audit: This allows visibility only and no remediation. Read-only permissions will be requested from Microsoft 365.
- Audit with enforcement: Allows visibility and on-demand or automated remediation. Read/Write permissions will be requested from Microsoft 365.
3. Now connect to Microsoft 365.
- Click on Connect to Microsoft 365.
- Log in to your Microsoft 365 account. The account must have Global Admin rights so you can set up journaling in Microsoft 365. Note that the account will not be used or stored by Cloud Mailbox.
- Now accept the permissions for the Cloud Mailbox application, then you’ll be redirected to the Cloud Mailbox setup page.
4. In case you are a user with a secure email gateway, then you have to add a connector in Microsoft 365. In order to make sure journals are sent directly from Microsoft 365 to Cloud Mailbox without the need to pass through the secure email gateway, you can add an outbound connector in Microsoft 365. And note that the connector must be added before you set up the journaling.
To do so, log to Microsoft 365 Exchange Admin Center and create a new connector using “Add a connector wizard”:
- Connection from: Office 365
- Connection to: Partner organization
- Connector name: Outbound to Cisco Secure Email Cloud Mailbox and check the “Turn it on” box
- Use of connector: Only when email messages are sent to these domains (mail.cmd.cisco.com)
- Routing: Use MX records associated with the partner’s domain
- Security restrictions: Use Transport Layer Security TLS to secure the connection, and this is the recommended setting
- Validation email: Your journal address from the Cloud Mailbox setup page.
5. Now it’s time to set up journaling in Microsoft 365 to send journals to Cloud Mailbox and to do this you need to add a journal rule. After applying the rules, you’ll start seeing data in the console within 10-60 minutes of enabling the journal rule.
Now, a Cisco Secure Malware Analytics account will be created and you’ll receive a welcome email. The new account won’t be linked to any existing Malware Analytics account, and you don’t need to take any action on the Malware Analytics account to set up Cloud Mailbox.
- Now copy your journal address from the Cloud Mailbox setup page.
- Go to Microsoft 365 Admin Center through the link: https://admin.microsoft.com/AdminPortal/Home#/homepage.
- Now navigate to Admin Center >> Exchange >> Compliance management >> journal rules.
- Add an Exchange recipient to the “ Send undeliverable journal report to” field. The email address used will not be journaled and remember not to use an address you want Cloud Mailbox to analyze.
- If you don’t have any rules, click + button to create a new journal rule.
- Paste the journal address you copied earlier into the “Send journal reports to” field.
- Enter Cisco Cloud Mailbox in the Name field.
- Select “Apply to all messages” from the “If the message is not sent to or received from” drop-down menu.
- Select the appropriate option from the “Journal the following messaged” drop-dow menu.
In case you’re already a Cloud Mailbox customer, then choose “All messages”, and in case you are a CES Internal Mailbox Defense IMD customer, then select “Internal massages only”
- Click Save.
6. Go back to the Cloud Mailbox setup page and click “Enable policy enforcement”.
Congrats, you’re all set!
Import your domains
The final step is importing your domains so you can apply automated remediation.
- Navigate to Settings >> Policy.
- Click on the Update imported domains button to import your domains to the Cloud Mailbox.
- Use the check box next to each domain to adjust the automated remediation setting for that domain.
- Click on Save and Apply.
The trip is over and you’re set to go and exchange emails without having to worry about a thing.
Reach out to us!
Ctelecoms is a proud Cisco and Microsoft partner, working to provide the best technology services and solutions in Saudi Arabia.
Reach out to our team for further info at: https://www.ctelecoms.com.sa/L125/ciscosecurity