


2019/05/05 Microsoft Cloud Solutions 4471 visit(s)
Ctelecoms

Modern technology gives employers as well as business owners almost limitless opportunities for productivity and efficiency gains, but much of that potential lies untapped. Developing an awareness of the capabilities of your everyday software and learning how to access little-known features can help you and your team produce better deliverables using less time. And when your employees efficiently execute their tasks and other responsibilities, they will make a great contribution to the success of their company by increasing their personal value.
Today’s blog will give you an important (but often overlooked) Outlook tip that will help you recall or get a second chance to make changes to an email that’s just been sent before it gets opened by the recipient.
We all know how it feels like to send an email, only to realize you’ve included an embarrassing mistake in it. Or even worse, you accidentally sent your email to the wrong recipient. Before you start cringing at the thought of what you’ve done, we have some good news for you: A lot of email clients give people the ability to recall emails after they’ve been sent.
In this blog, we’ll teach you exactly how to recall an email in Outlook, Microsoft’s popular email service. If you use Outlook to manage your email, check out the step-by-step process below for an easy way to pull those emails back from the brink.
Step 1: Open your Sent Items folder, and look for the email you want to recall — it should be at the top of the list. Double-click to fully open it.
Step 2: Check the top of the window and make sure that you are in the Message tab. Then look for the drop-down menu that says Actions. It should be next to the Rules and Move email options in your taskbar.
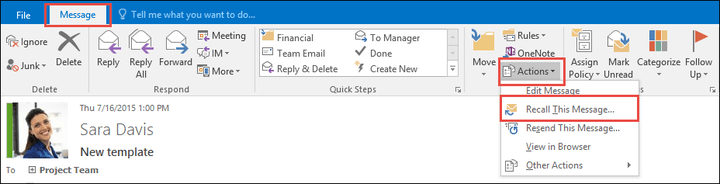
Step 3: Click Actions followed by Recall This Message.
Note: You need an Exchange account for this option to be available. Also note that certain administrators may block this option, depending on your organization.
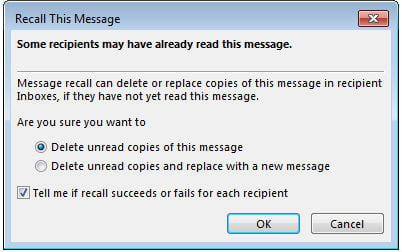
Step 4: You should now see the recall window that allows you to choose between simply deleting the unread copies of the message, or replacing the copy with a new message that contains proper information. You also get an option to receive a report on whether the recall succeeds or fails, on a recipient-by-recipient basis. Make the appropriate selections based on your situation, and then select OK.
If you deleted the message, congratulations — you just saved that embarrassing email from being read. If you want to replace it, continue on.
Step 5: If you create a replacement message, Outlook will take you to a new compose message screen. Just select Send whenever you are ready to start the recall process.
Note: If you send a recall message, it doesn’t exactly make your old email disappear. We’ll talk a little more about this is the section below, but in order to have the original message disappear, the recipient may have to open the recall message first.
This is why it may be a good idea to put “URGENT” or something similar in the title of your recall message to make sure it gets opened before the other email.
Besides, you lose control over your email after sending it to an external recipient who uses Gmail, Yahoo or other email servers, so Recall only works if you use Outlook with a Microsoft Exchange account, and your recipient uses the same Exchange server. If you do not know if you use an Exchange account, check the email tab from the Account Settings window (accessed from the File menu).
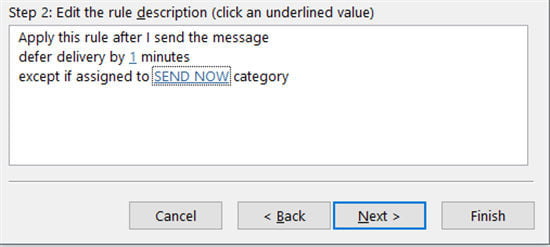
The solution is simple: Delay your emails. If you have a case of email butterfingers or are always busy replying and forwarding more sensitive types of information, you may want to consider delaying your emails. You can do this for all emails by going to File, selecting Manage Rules and Alerts, and choosing New Rule. Start from a Blank Rule, and skip conditions so that all emails are covered. Then in Step 1, select Defer delivery by a number of minutes. If you delay it by a couple of minutes, you can recall messages far more effectively when mistakes are made.
Ctelecoms Team
Upgrade your IT to be as agile and efficient ...