In this blog we will explain how to enroll devices into Microsoft Intune using Windows AutoPilot in a simple way by publishing the device with the use of PowerShell commands.
But before we get started, let us introduce you to Windows AutoPilot.
What is Windows AutoPilot?
Before going deep into Windows Autopilot, we first need to know what Windows AutoPilot in the first place is.
Windows AutoPilot is a collection of technologies used to set up and pre-configure new devices, getting them ready for productive use. You can also use Windows Autopilot to reset, repurpose, and recover devices. This solution enables an IT department to achieve the above with little to no infrastructure to manage, with a process that's easy and simple.
Advantages of Windows Autopilot:
AutoPilot, indeed, has lots of advantages, especially during these situations of Covid-19 and lockdown. Let’s assume that, during these days of remote working enforcement, one of the employees needed a brand-new laptop for some reason. All you need to do is ship a laptop by the vendor, your CSP partner or IT department, request the end user to connect the device to the internet then, and let Autopilot take it from there, starting from configuring the device, installing application … etc.
Also, you will find some of the other advantages listed below:
• As we all know, to enroll a Windows 10 device into Microsoft Intune, the end user should have an administrator privilege on the device. But in some organizations, this is prohibited. Windows Autopilot enrolls the device into Intune while also managing the permissions for the users.
• IT can customize the out-of-the-box-experience (OOBE) by simplifying the setup process for the user instead of going through a long, time-consuming, and sometimes complicated setup process.
How To Configure Windows Autopilot
To start the configuration of Windows Autopilot we need to take couple of points in consideration.
• Administrators must have access to Intune portal to configure the deployment.
• Make sure the installed version of Windows 10 is 1703 or above since Autopilot is not supported in the earlier versions. There is another technical way to enroll the old devices by injecting them with a JASON file.
• Also make sure that new devices haven't been through Windows out-of-box experience yet.
Setting up Windows AutoPilot:
Setting up Windows AutoPilot will go through the below processes in order:
1. Create a dynamic security group in Azure AD.
2. Create a Deployment Profile.
3. Enroll the device into Windows AutoPilot.
Step 1: Create a dynamic security group in Azure AD.
The reason we need this group is, to automatically add any new published device into AutoPilot as a member immediately. We need this group to assign it in the Deployment Profile that we will create later. To do that:
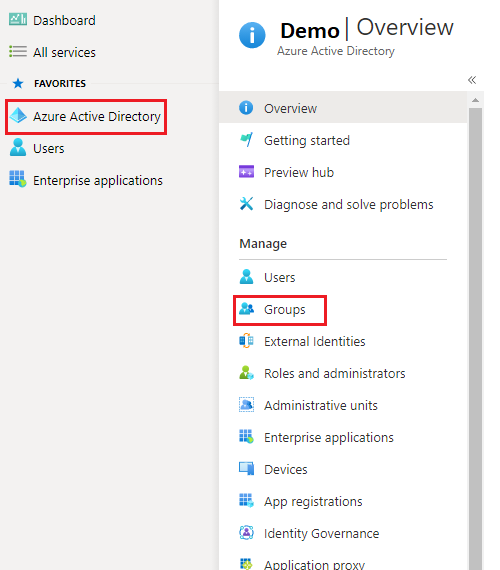
• Navigate to Azure Active Directory tap in Office 365.
• Click on Azure Active Directory on the left panel.
• Under Manage click on Groups.
Figure 1: Add New Group
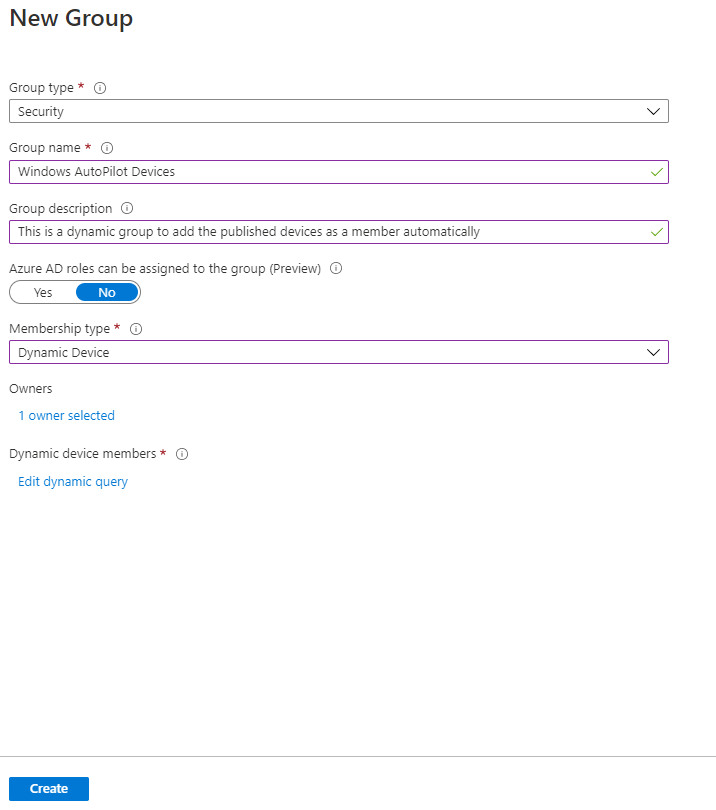
• Click on New Group.
• Choose Security from Group Type.
• Specify the group name and the description.
• Choose Dynamic Device from Membership type.
• Specify the owner of the group.
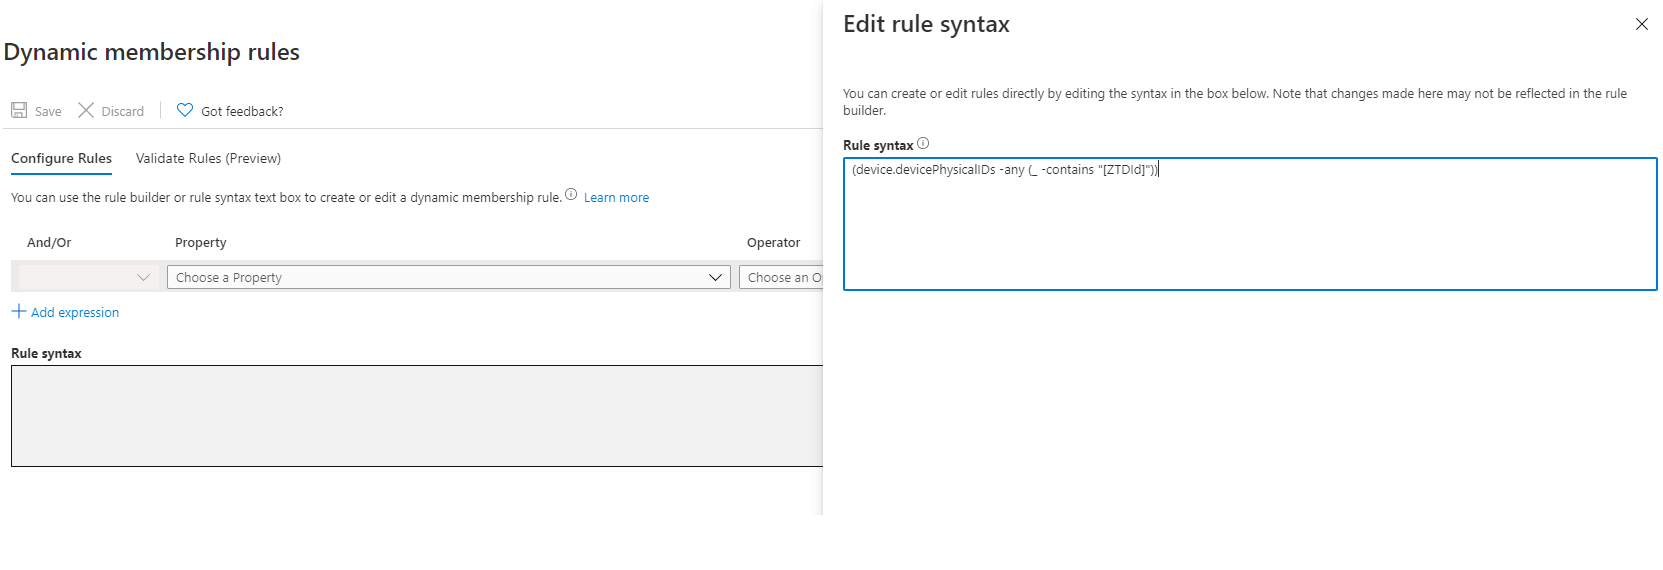
• Select Add dynamic query > Rule Syntax.
• Edit Rule Syntax and add the below formula:
(device.devicePhysicalIDs -any (_ -contains "[ZTDId]"))
Figure 2: Dynamic Query
• The above query will add all the AutoPilot devices that matches this condition automatically based on ZTD ID, Zero Touch Deployment.
• Click on Create to save the group
Figure 3: AutoPilot Devices Group
Step 2: Create a Deployment Profile.
After we have created the dynamic security group, it is time to create a Deployment Profile and assign it to the dynamic group that we have created in Step 1.
•
Click
here to move to Intune endpoint portal.
Note: there’s also a short URL from Microsoft that will also take us to the separate portal:
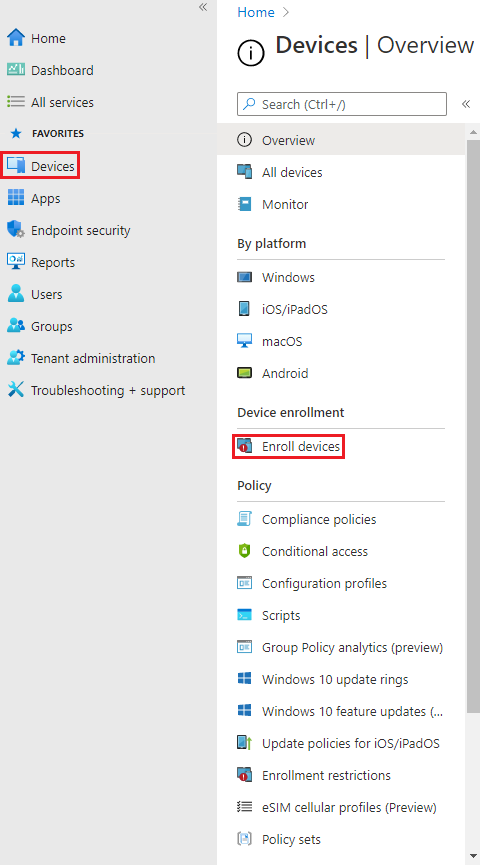
• Navigate to Windows AutoPilot, to do that use the below points:
o On the left panel click on Devices.
o From Devices blade, Under Device enrollment Click on Enroll Devices.
Figure 4:Devices - Enroll Devices
o Under Windows AutoPilot Deployment Program click on Deployment Profiles.
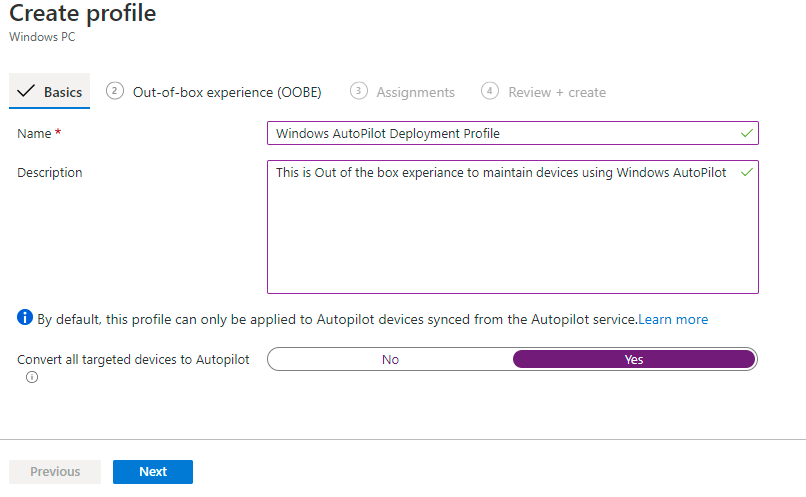
• Click on Create Profile and choose Windows PC.
• On the Basics page, type a Name and an optional Description.
• It is always a good thing to set Convert all targeted devices to Autopilot to Yes as all the new added devices to the group automatically will have the deployment profile.
• Click on Next.
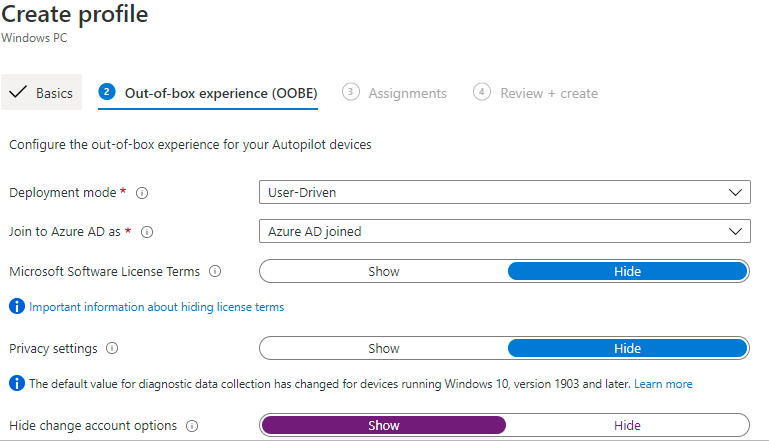
Figure 5: Deployment Profile OOBE
On the Out-of-the-box-experience screen we will go through the configuration that will apply on the device after enrolling it.
• Deployment Mode: User-driven, this means that the profile is associated with the user enrolling the device and User credentials are required to enroll the device.
Note: we will go through this option, maybe we will cover the other option (Self-deploying) since it is also a quite interesting feature.
• Join to Azure AD as: choose Azure AD Joined.
• Microsoft Software License Terms: Choose Show if you want to show End-user license agreement (EULA). I will select Hide as the default.
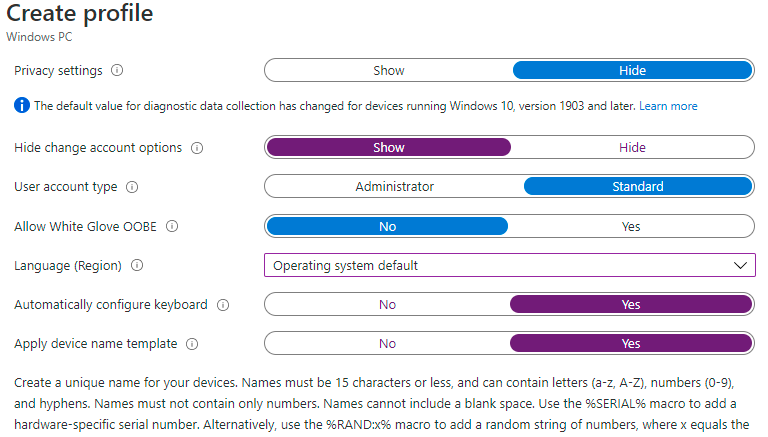
• Privacy settings: Choose whether you want to hide or show privacy settings and make the user accept it.
• Hide change account options (requires Windows 10, version 1809 or later): Choose Hide to prevent change account options from displaying on the company sign-in and domain error pages. But it requires company branding as a prerequisite. I will choose Show
• User account type: Choose the privilege that you want to grant to the user. Local administrator or a Standard user.
• Allow White Glove OOBE: Microsoft has changed the name if this feature to Pre-Provision. It is a way to speed the enrollment by configuring the details by the IT partner or IT department before shipping the device to the end user. It needs more hardware specification. I will set this feature to No during this demo.
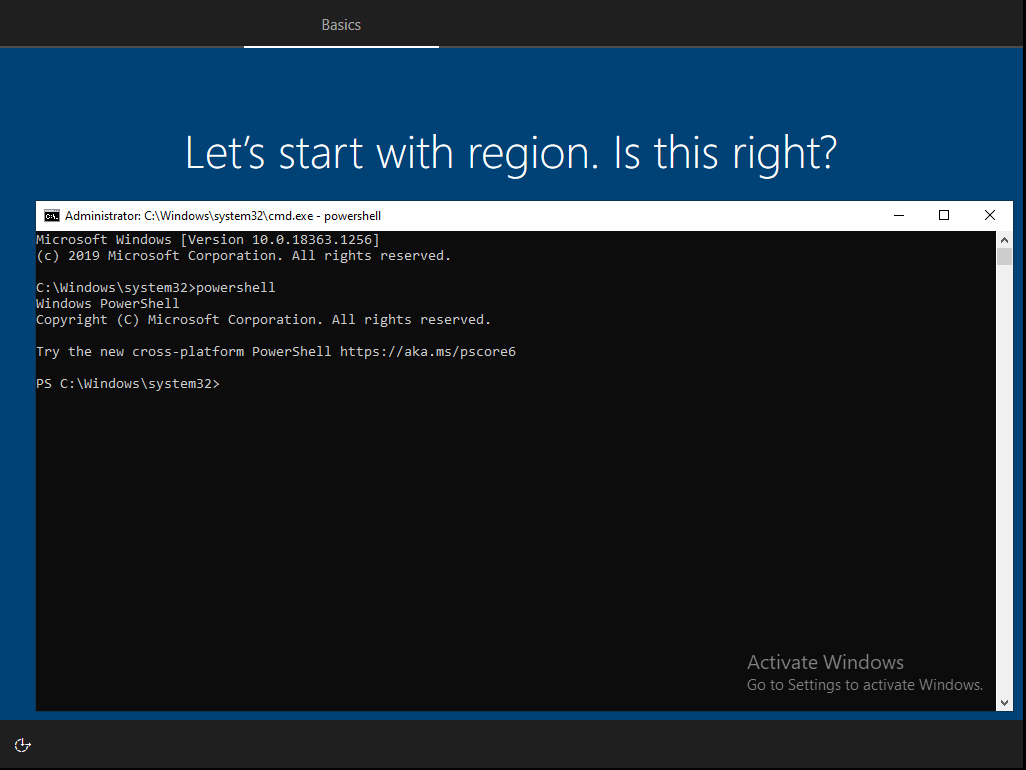
• Language (Region): Specify the language and region that will be used: I will keep it default. Operating system default. Since customizing this feature works only with Self-deploying mode.
• Automatically configure keyboard: I will set this feature to Yes. To skip choosing the language.
• Apply device name template: This feature works only with Azure AD type. It does not work with Azure Hybrid AD as the device name should be changed from Active Directory.
The template maximum charachtors are 15, it can include special character.
I will add the template to be: Company Name followed with 4 digits that can be chosen randomly. The syntax is, MyCompany-%RAND:4%
• Click Next.
Figure 6: Creating Deployment Profile Part1
Figure 7: Figure 6: Creating Deployment Profile Part2
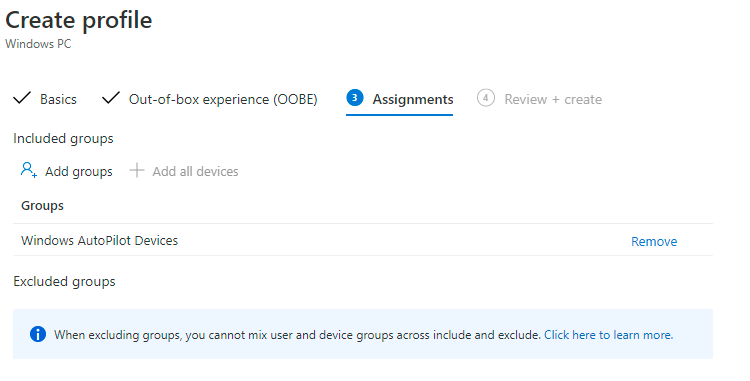
• Assignment
• Click on Add groups. Choose the dynamic group that you created in step 1.
• Excluded groups is a good feature if you want to prevent group of devices from have the created deployment profile.
• Click Next.
• Click Create to create the profile.
Figure 8: Assignment Customization
Step3: Enroll the device into Windows AutoPilot.
Now, we have a dynamic group and deployment profile. It is the time to publish the device into Windows AutoPilot.
• Make sure the targeted device is connected to Internet.
• On the targeted device, hit Shift and F10.
Note: Make sure your keyboard modifier function keys is active then you have to press on Fn + Shift + F10
• A Command prompt will appear at the screen.
• Type PowerShell to start typing powershell commands.
Figure 9: PowerShell
• There are some packages we need to install to finalize the publish of the devices, these are the commands in order:
o Install-Module Microsoft.Graph.Intune
We need to install the module of Microsoft Graph to publish the device.
Type Y to install and import Nugget Provider.
Type Y to confirm installing package from PSGallery.
o Install-Module -Name WindowsAutoPilotIntune
We need this command to start creating Intune Commands.
Type Y to confirm installing package from PSGallery.
o Set-ExecutionPolicy Bypass
Before executing any new script we need to allow executing policies on the new device and change it is default value from Restricted to Unrestricted or Bypass.
o Install-Script Get-WindowsAutoPilotInfo
o To have a general look how the Hash code, serial number and Windows Product ID run the following command:
o Get-WindowsAutoPilotInfo.ps1| Format-list
o We will publish the device to Windows AutoPilot with a very simple way provided by Microsoft, that will get the Hash code of the Hardware and publish the device automatically.
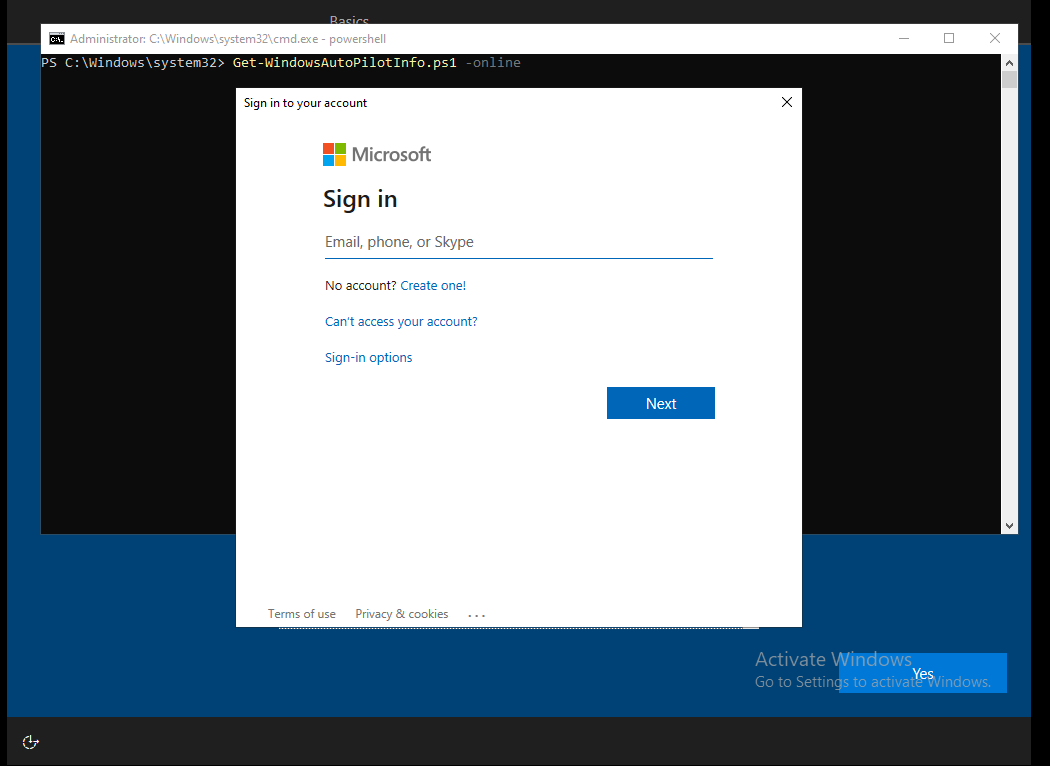
Note: Running the below command will request you to sign in as Intune admin.
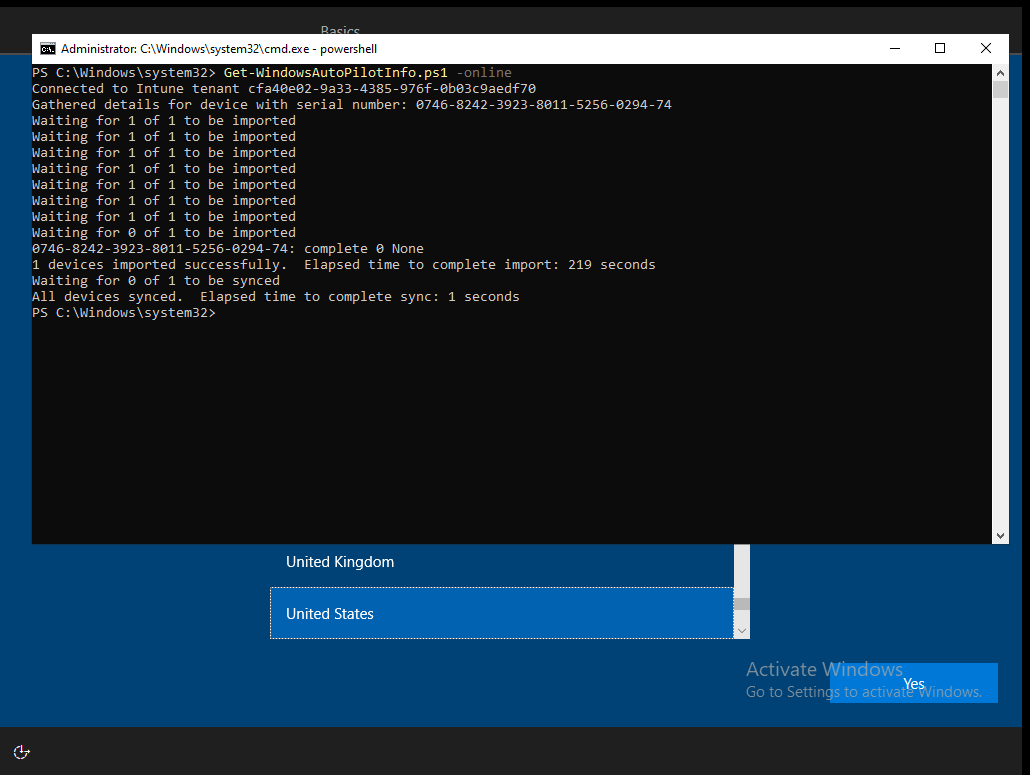
o Get-WindowsAutoPilotInfo.ps1 -Online
o Sign in as an admin to Intune.
Figure 10: Signin as Administrator to Intune
o After signing in successfully, the device will be imported to Intune. It will take around two minutes to import the device into AutoPilot portal.
Figure 11: Publishing Device to Intune
Note: we still can import the device using the old way by saving a csv file and import the file into the portal. That’s can be done using the below command:
Get-WindowsAutoPilotInfo.ps1 -OutPutFile C:AutoPilot.csv
Then to copy the file to an External USB let’s say run the below command to open C folder and copy the file.
Run this command: Invoke-Item “C:” and then copy the file.
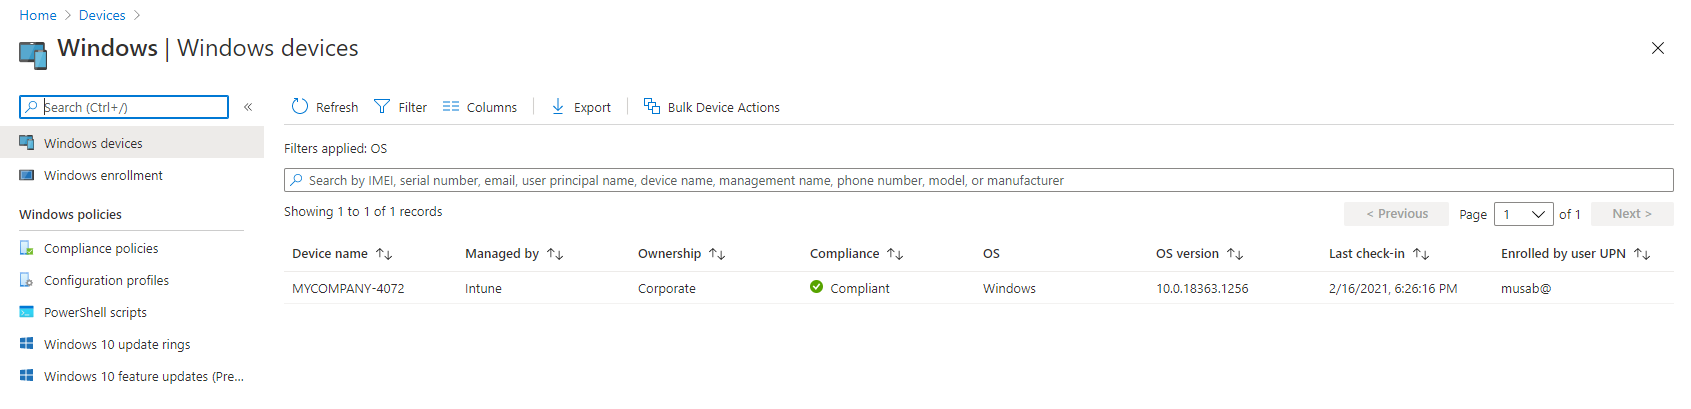
• Now we have the device imported into Windows AutoPilot. Let’s have a look at the device.
From Endpoint portal Navigate to Devices -> Enroll Devices -> Under Windows AutoPilot Deployment Program click on Devices.
Figure 12: Enrolling the Device, First step
Figure 13: Enrolling the Device, Second Step
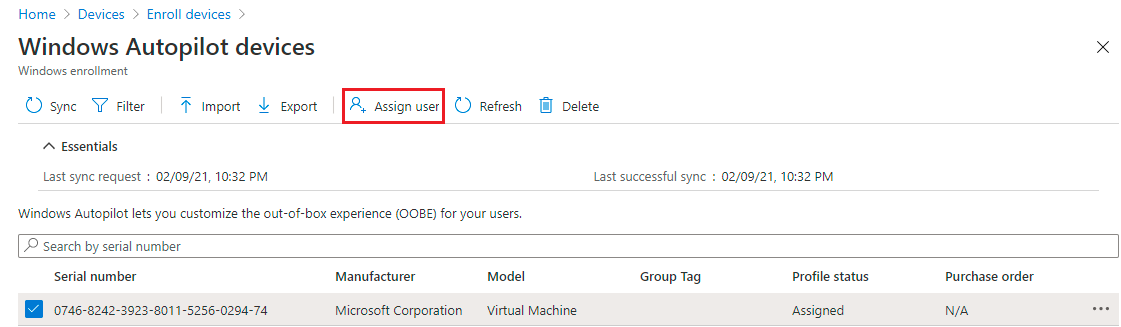
The device of us is appearing in Windows AutoPilot devices as we can see in the below figure.
Figure 14:Device appear in Intune
As you noticed the profile status is assigned automatically, because the device is dynamically registered in our security group and the profile is assigned to that security group.
Next step is, to assign the imported device to the user that will have access on.
To do that:
• click on the device and from the upper menu select Assign.
Figure 15: Assign user to the imported device.
• A list of users will appear, select the user that will have access on the device and click on save.
• Another prompt will appear to confirm the username, Device Name. Click Save to close the prompt.
Note: It is always recommended to sync the device after to deploy all the assigned updates to the device. And to sync the device it might take from 15 to 20 minutes.
Figure 16: Syncing the Device.
Going back to the device - Virtual Machine in my case - and now we are ready to watch Windows AutoPilot results.
First thing that we need to do is, restart the device to have the latest update.
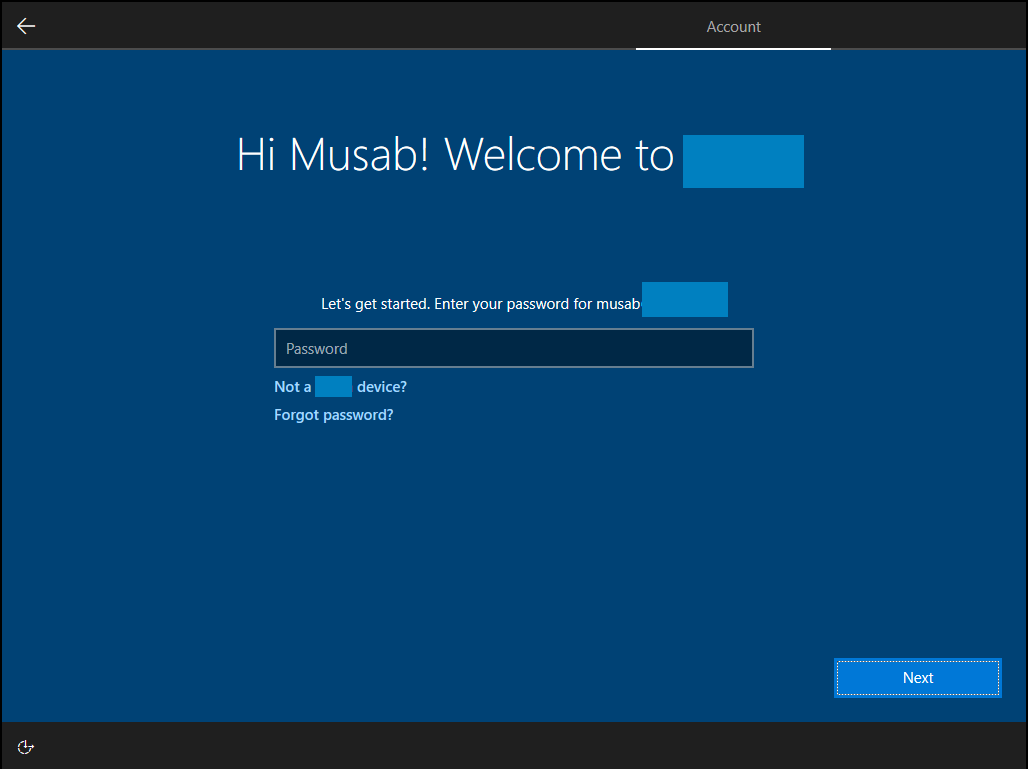
As a result, after the restart you will have the below welcome screen.
Figure 17: Welcome Screen for AutoPilot
• Sign in as the user account you assign the device for.
It will take some time after signing in to create the profile and the other sittings.
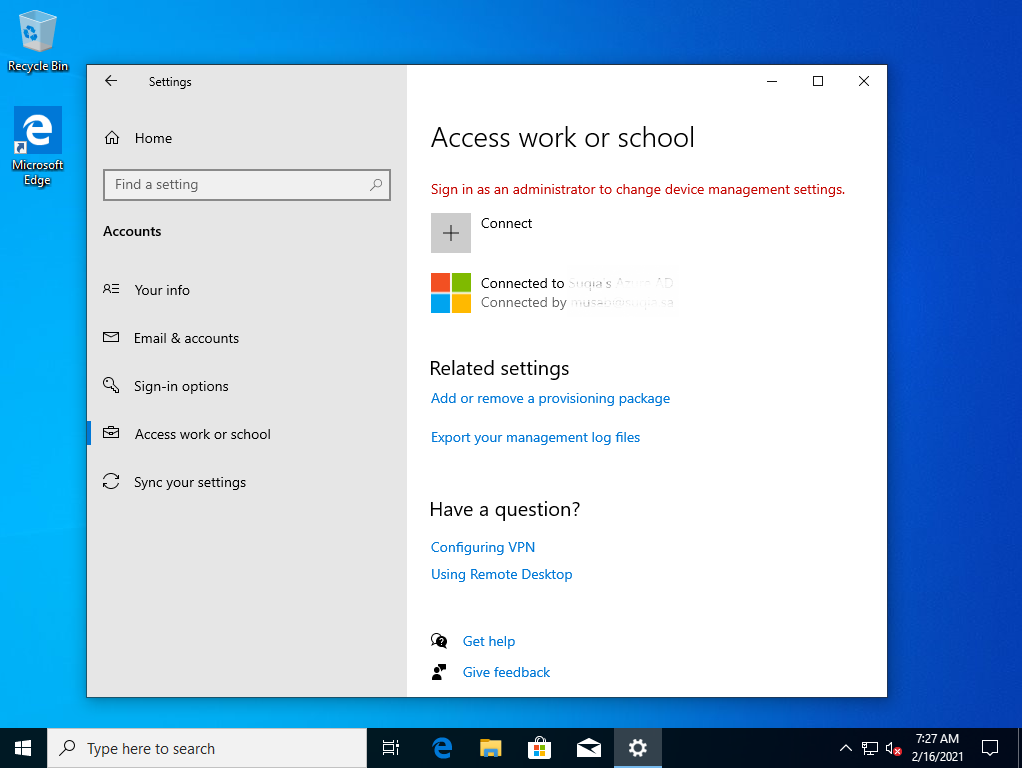
Once the setup of the profile is complete, you will find that the device is enrolled into Intune immediately with the settings you have customized during OOBE deployment.
Figure 18: Device ready and user has access as a Standard account
Figure 19: Device is enrolled in Intune
That's all, folks! We hope we have managed to help you out.
Ctelecoms Team!
Refrences: